
Hansel
스프링부트 기초 / 웹 계층 개발2 본문
앞선 글과 같이 상품에 대해서도 Controller를 작성한다.
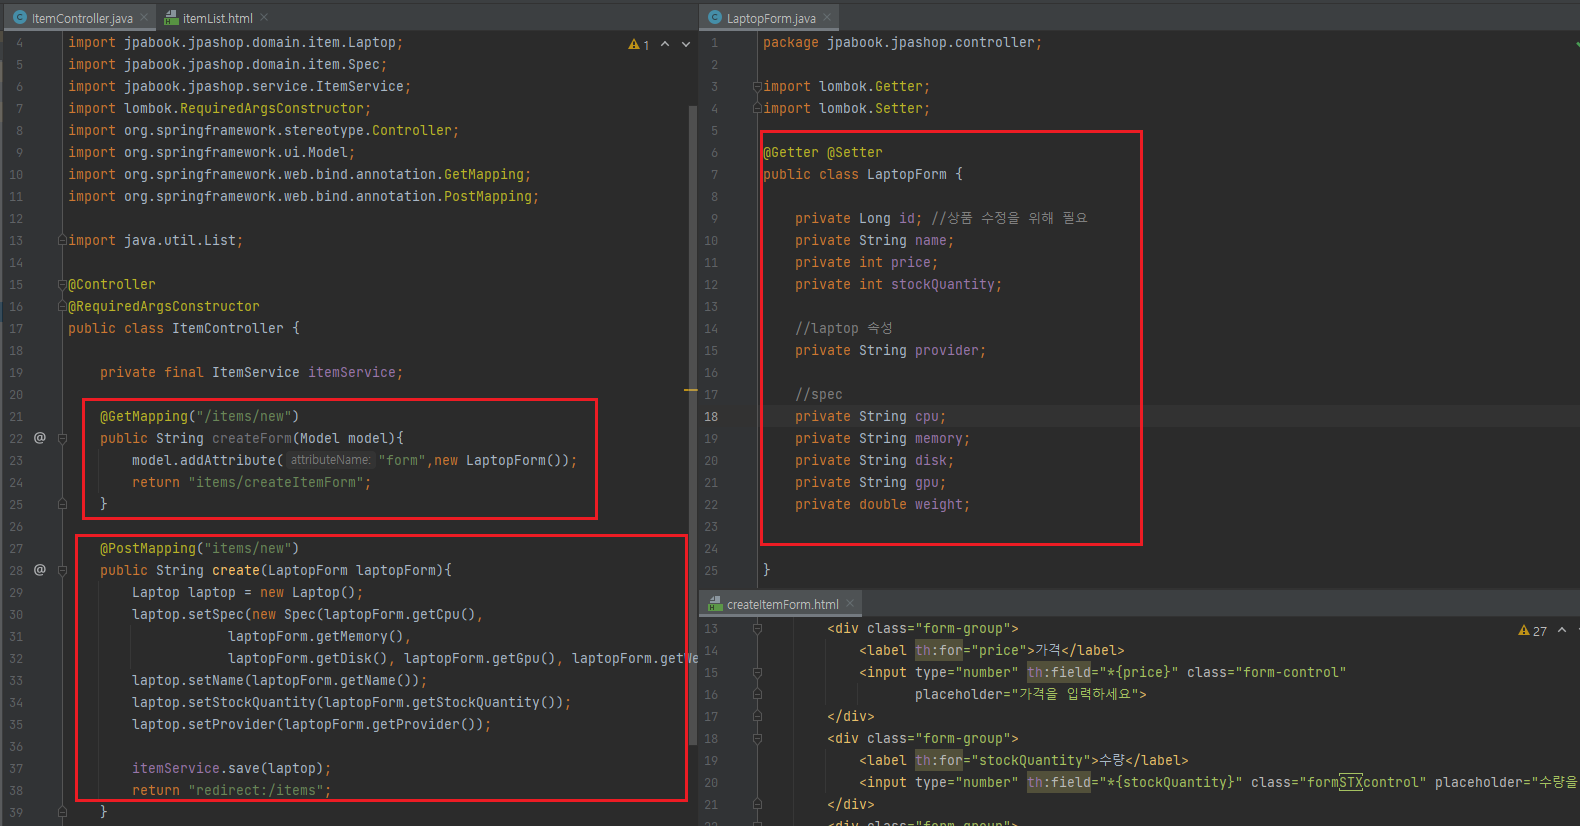
laptopForm은 등록 아이템에 따라 다른 폼을 보낼 수 있도록 동적으로 해보는 도전이 필요해 보인다.
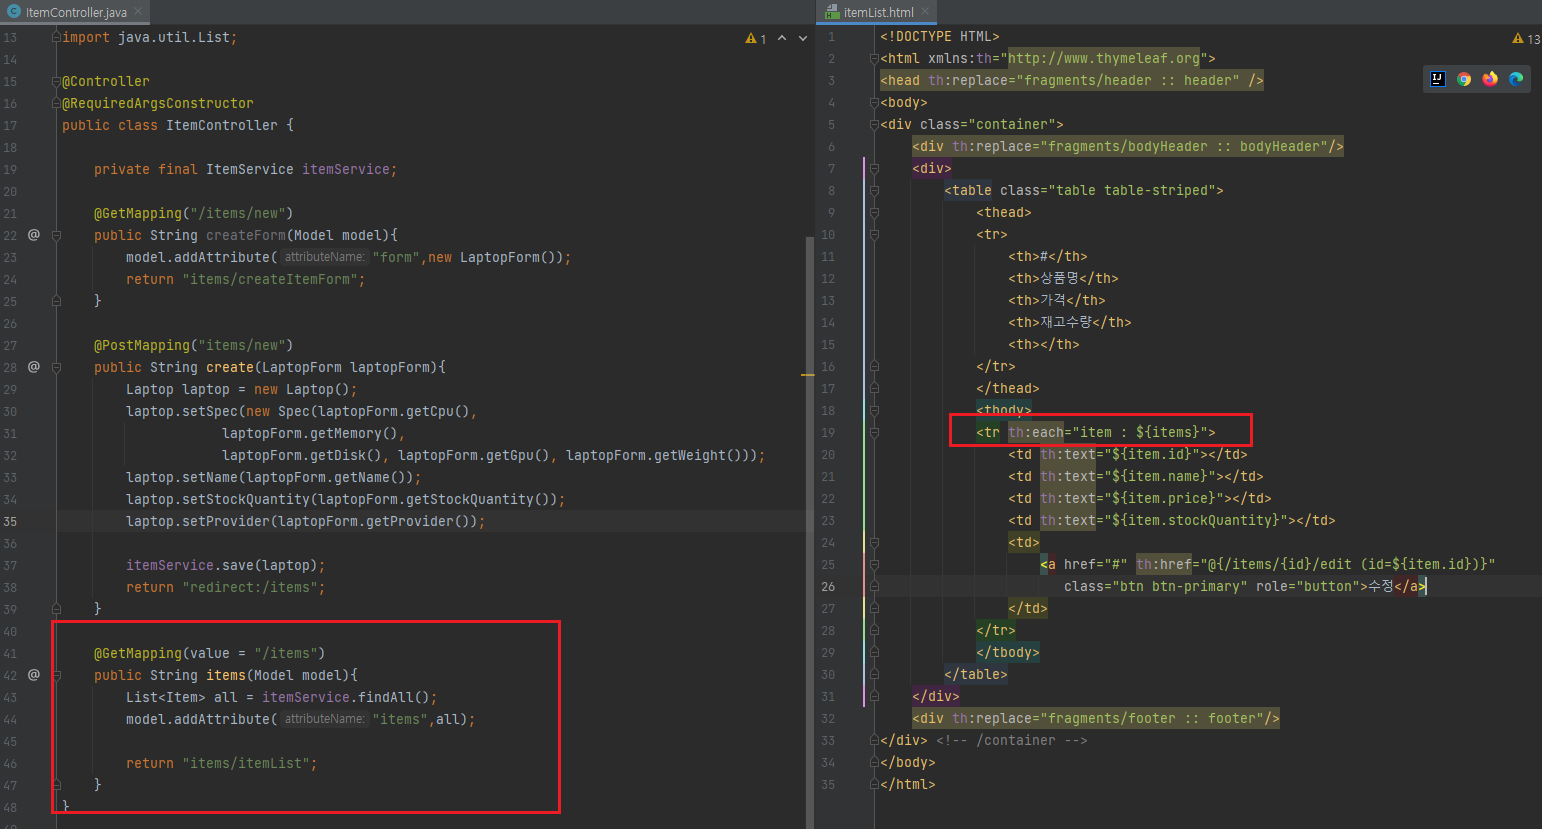
조회를 위한 html도 함께 작성한다.
결과


정상적으로 DB에 등록되는지 확인해야 한다.
OrderController
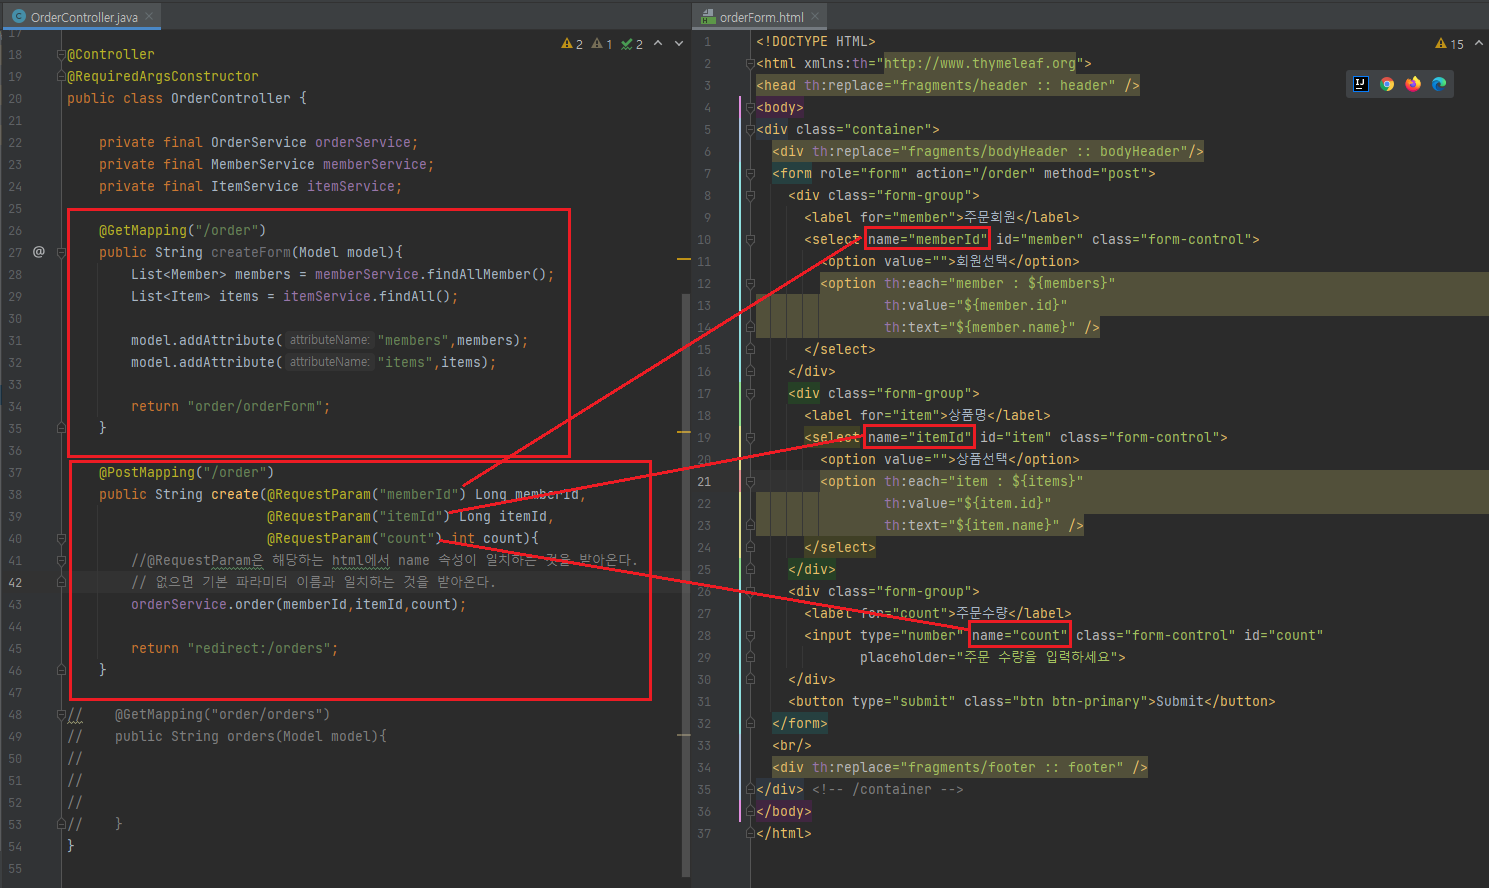
폼을 받고 보내는 것은 이전에 봤던 방식과 똑같다.
@RequestParam만 잘 이해하면 된다.
@RequestParam
- 간단한 파라미터 요청 방식이다. 넘어오는 매개변수의 name 값을 적어서 거기에 필요한 값을 value로 받는다. URL 과 같이 보면 이해가 쉽다.
- @RequestParam은 required 옵션을 같이 쓰는데 기본값은 true다. 따라서 false가 아닐 때 받아온 data가 없다면 400 에러를 발생시킨다.
이전에 사용했던 @RequestParam은 get 요청으로 쓰였지만 이번엔 post 요청으로 쓰였다.
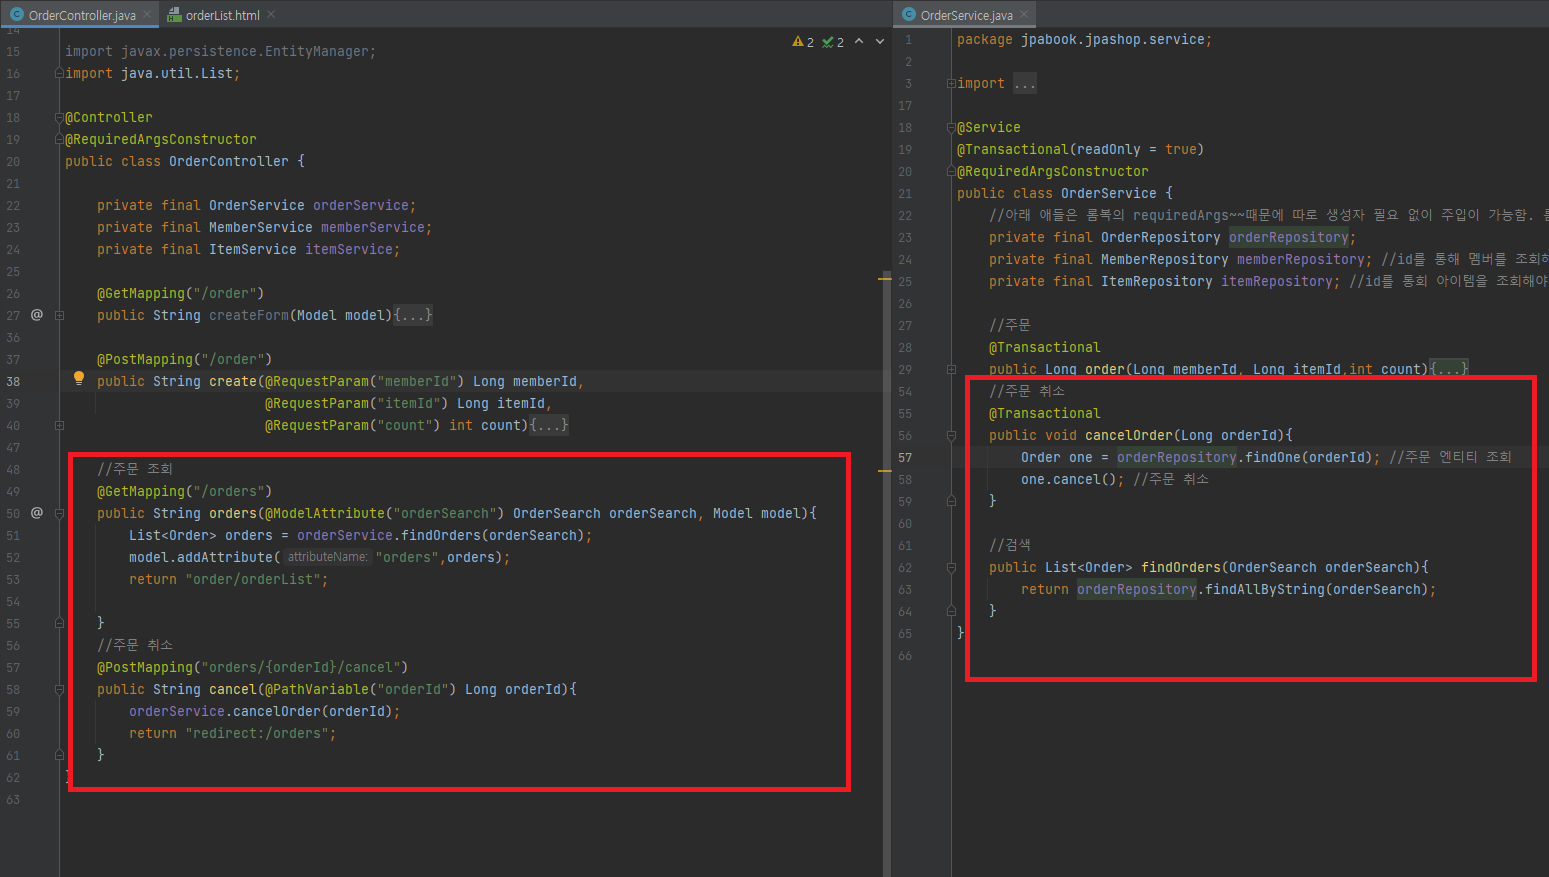
주문의 조회와 취소
주문 목록 html
<!DOCTYPE HTML>
<html xmlns:th="http://www.thymeleaf.org">
<head th:replace="fragments/header :: header"/>
<body>
<div class="container">
  <div th:replace="fragments/bodyHeader :: bodyHeader"/>
  <div>
    <div>
      <form th:object="${orderSearch}" class="form-inline">
        <div class="form-group mb-2">
          <input type="text" th:field="*{memberName}" class="formcontrol" placeholder="회원명"/>
        </div>
        <div class="form-group mx-sm-1 mb-2">
          <select th:field="*{orderStatus}" class="form-control">
            <option value="">주문상태</option>
            <option th:each=
                            "status : ${T(jpabook.jpashop.domain.OrderStatus).values()}"
                    th:value="${status}"
                    th:text="${status}">option
            </option>
          </select>
        </div>
        <button type="submit" class="btn btn-primary mb-2">검색</button>
      </form>
    </div>
    <table class="table table-striped">
      <thead>
      <tr>
        <th>#</th>
        <th>회원명</th>
        <th>대표상품 이름</th>
        <th>대표상품 주문가격</th>
        <th>대표상품 주문수량</th>
        <th>상태</th>
        <th>일시</th>
        <th></th>
      </tr>
      </thead>
      <tbody>
      <tr th:each="item : ${orders}">
        <td th:text="${item.id}"></td>
        <td th:text="${item.member.name}"></td>
        <td th:text="${item.orderItemList[0].item.name}"></td>
        <td th:text="${item.orderItemList[0].orderPrice}"></td>
        <td th:text="${item.orderItemList[0].count}"></td>
        <td th:text="${item.status}"></td>
        <td th:text="${item.OrderTime}"></td>
        <td>
          <a th:if="${item.status.name() == 'ORDER'}" href="#"
             th:href="'javascript:cancel('+${item.id}+')'"
             class="btn btn-danger">CANCEL</a>
        </td>
      </tr>
      </tbody>
    </table>
  </div>
  <div th:replace="fragments/footer :: footer"/>
</div> <!-- /container -->
</body>
<script>
 function cancel(id) {
 var form = document.createElement("form");
 form.setAttribute("method", "post");
 form.setAttribute("action", "/orders/" + id + "/cancel");
 document.body.appendChild(form);
 form.submit();
 }
</script>
</html>
스프링 기초 관련 게시글은 강의를 들으면서 타이핑 한 것을 게시글로 옮긴 것인데 글 자체는 정돈이 되어 있지 않다.
토이프로젝트를 하면서 새로 배우는 것들을 추가하고 잘못된 것을 수정할 계획이다.
'Spring > 기초' 카테고리의 다른 글
| 스프링 부트 / 야매 게시판 만들기 1 (0) | 2022.03.05 |
|---|---|
| 스프링부트 기초 / 변경 감지와 병합 (0) | 2022.02.21 |
| 스프링부트 기초 / 웹 계층 개발 (0) | 2022.02.21 |
| 스프링부트 기초 / 도메인 설정 2 (0) | 2022.02.21 |
| 스프링부트 기초 / Repository & Service (0) | 2022.02.21 |
'Spring/기초' Related Articles
more


